Saturday, 16 July 2016

Maintaining your transmission

Automatic transmission
Automatic transmission. Click for larger view
An automatic transmission is the most complex and one of the most expensive to repair components of your vehicle. It has to do a lot of work and it doesn't require as many regular services as your engine. This is probably one of the reasons the transmission often gets neglected. Everybody knows that engine oil must be changed regularly for the engine to last, but what about the transmission? An automatic transmission depends on the transmission fluid to do all the work: the transmission fluid transfers the hydraulic pressure to shift the gears, it lubricates all the moving parts and cools down the transmission. The transmission fluid lasts longer than engine oil, but it still deteriorates over time and under load and high temperature. For this reason, keeping your transmission fluid clean and at the proper level is vital. It's also important to use only the proper type of the transmission fluid.

Where is the automatic transmission dipstick located

Check the owner's manual to see where the transmission fluid dipstick is located in your car. You can quickly find in the book's maintenance section: 
Maintenance » Do-It-Yourself Maintenance » Engine Compartment
Yo will see the engine compartment map with the descriptions. Here are few examples: click on the car model to see where is the transmission dipstick located in that car (pointed with orange arrow).


Checking automatic transmission fluid

On most cars and trucks, you still can check the transmission fluid level and condition with a dipstick, similarly to an engine oil. Check your owner's manual for the correct procedure, as it may be a bit different for different cars; for example, in many Honda vehicles the transmission level is checked with the engine off, while it most other cars, the transmission fluid level is checked with the engine running and the transmission in Park. Some newer cars and trucks actually don't even have a transmission fluid dipstick and the level can only be checked at the dealer or a repair shop.
Transmission fluid dipstick
In this Mazda 6, for example, according to the owner's manual, the steps are as follows: 
1. Park on a level surface and set the parking brake firmly.
2. Idle the engine about two minutes. Push down on the brake pedal.
3. Move the shift lever through all ranges and set it at P.
Checking transmission fluid level
4. With the engine still idling, pull out the dipstick, wipe it clean, and put it back.
Transmission fluid level
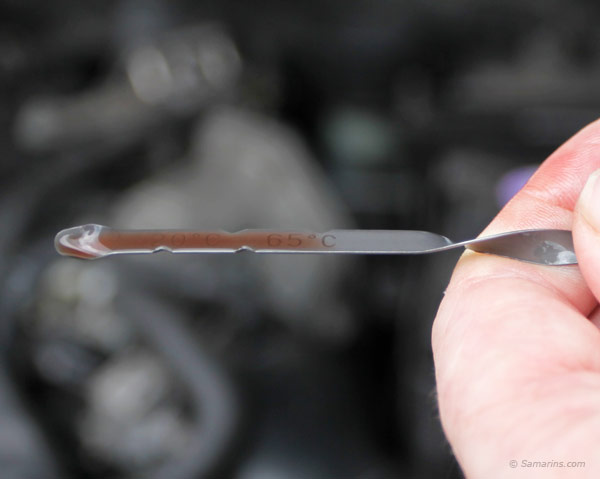
5. Pull it out again and check the fluid level.
The proper fluid level is marked on the dipstick.

This is how it looks. In this photo, the level is OK and transmission fluid still looks not too bad, but it won't be a bad idea to change it in the near future.
Checking automatic transmission fluid condition
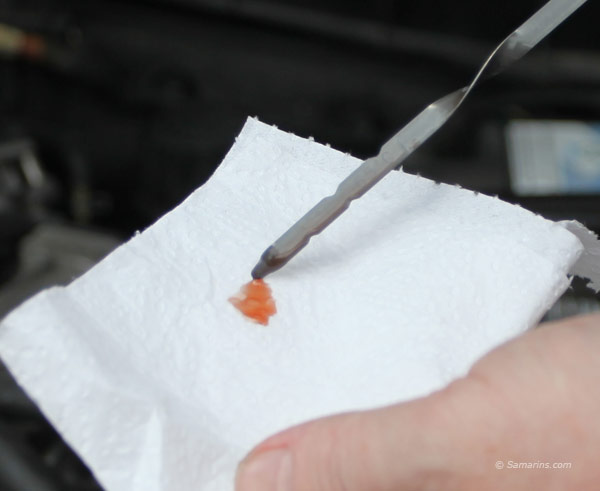
To see the condition of the fluid better, drip it on a white paper towel. The new automatic transmission fluid usually comes red. Over time, it deteriorates and becomes more brownish. It's good idea to change it before it becomes too dark. See the chart.
Transmission fluid color
The transmission fluid change intervals vary from 25,000-30,000 miles to 60,000 miles. You can find the exact interval in the maintenance schedule in your owner's manual or just call your dealer.

What can damage your automatic transmission

Most of the transmission problems starts from overheating. Under heavy load, such as when towing a heavy trailer, rocking the vehicle from the snow, having continuous stop and go traffic in hot weather, racing, etc. the transmission overheats. At higher temperatures the transmission oxidizes, losing its lubricating qualities and leaving deposits all over inside the transmission. If you'd check the automatic transmission fluid in an overheated transmission, it would be dark and dirty, with a strong burnt smell. Exposed to the heat the rubber seals, O-rings become hard and brittle. The metal parts warp causing valves to stick in. All this, sooner or later, results in transmission failure. For example, a friend of mine has burned his automatic transmission when he was spinning the wheels too hard trying to free his shiny Audi from the snow; it was on the next day after he bought it!
However, overheating is not the only reason; sometimes an automatic transmission problems are caused by design flaws faulty parts, lack of maintenance or poor rebuilt job. A too low or even too high transmission fluid level or wrong transmission fluid type can also cause transmission problems. A person I know added a gear oil into the automatic transmission by mistake - guess what happen - the transmission failed after 40 minutes of driving!

How to prevent automatic transmission problems

Regularly check your parking space for leaks and if you see any, get it fixed before lack of oil or fluid can cause expensive problems.
Once in a while check the transmission fluid level and condition. However, not all cars have the automatic transmission dipstick; in some cars, for example, in late Volkswagen models, the transmission fluid can only be checked by a mechanic in the repair shop. You can check your owner's manual for instructions to check the automatic transmission fluid. If the transmission fluid level is too low, there is a leak somewhere that needs to be fixed. Change the transmission fluid as often as it's recommended in your owner's manual or when it becomes too dark (rather brown than red) or dirty. 
Use only the same type of transmission fluid as specified in the owner's manual or on the dipstick. Many newer vehicles are very sensitive to the fluid type. For example, the owner's manual for 2008 Honda Civic says "Using transmission fluid other than Honda Genuine ATF-Z1 may cause deterioration in transmission operation and durability, and could result in damage to the transmission". Never shift to the Reverse or Park modes until the car comes to a complete stop. Don't shift the transmission from 'Park' to other modes at high engine RPMs.
In many cars, the automatic transmission can be damaged if towing with the drive wheels on the road. If you have to tow your vehicle, check your owner's manual for the proper way of doing it. If you planning to tow a heavy trailer with your vehicle, consider installing an additional transmission fluid cooler. It's also good idea to change your transmission fluid more often when towing a trailer.

Transmission flush vs drain and refill

There are two ways to replace transmission fluid. The 'drain and refill' method involves draining transmission fluid from the drain plug, or if there is no drain plug, from the transmission pan and refilling the transmission with new fluid. In some cars, there is a transmission fluid filter that also should be replaced when the fluid is changed. The 'transmission flush' is usually done with a special transmission flush machine that is connected in series to one of the transmission fluid cooler lines. With the engine running the transmission flush machine gradually pumps out old transmission fluid replacing it with new fluid at the same time. What is the difference? With the 'drain and refill' method only about 40%-50% of transmission fluid can be changed at once, because a large portion of fluid remaining in the torque converter, valve body and other parts of the transmission cannot be drained. Using the transmission flush machine allows replacing around 90-95% of transmission fluid at once. Which method is better? The opinions are divided. Using a transmission flush machine is obviously quicker and more efficient method and it is successfully used in many auto repair shops. However, half of the mechanics you ask, will tell you that it's better to repeat a 'drain and refill' method a few times. Some car manufacturers even don't recommend using transmission flush machines on their cars. For example, Honda mentioned in one of the newsletters for Honda technicians that'Transmission flush systems are not approved or recommended for Honda A/Ts'. All in all, the transmission flush method, if approved by a car manufacturer, might work well for low-mileage cars, while the 'drain and refill' method is probably safer for high-mileage vehicles. With either method, only the recommended transmission fluid type should be used.

How to use an overdrive

Generally speaking, an overdrive (O/D) is the highest gear in the transmission. On most cars the automatic transmission has three or four gears and an overdrive (forth or fifth gear). Overdrive allows the engine to have less rpm with the higher speed in order to have better fuel efficiency. When you switch it on, you allow the transmission to shift into overdrive mode after the certain speed is reached (usually 30 - 40 mph depending on the load). When it's off, the transmission won't shift into the overdrive gear. In normal driving condition the overdrive should be always on.
You may need to switch it off when driving in mountainous area or towing a trailer.
The automatic transmission automatically shifts from O/D to the lower gear when it feels more load. When it feels less load it shifts back to the O/D. Sometimes, under certain conditions, e.g. when driving uphill or towing a trailer, the transmission may not be able to decide to stay in OD or to shift into lower gear and it starts to shift back and forth continuously. This is the time you may want to witch the overdrive off and help the transmission to decide.
You also may need to switch it off when you want to slowdown using the engine braking, for example, driving downhill. For more details how to use an overdrive, check your owner's manual.

When it's time to visit a transmission shop

If you experience any problems with your transmission such as leaks, noises, problems with shifting, etc. (Follow this link to learn more: How to check an automatic transmission) - don't wait until the problem becomes worse and car will finally stop moving somewhere on a highway; visit your trusted local transmission shop. The automatic transmission problems never disappear by themselves. Also, when going for the repair, try to explain to service person in more details: what exactly problem you experience, when it happens, what does it look like. It will be easier for them to repair the transmission. Before going to the transmission shop for the repair ask them about the warranty - the longer warranty they will give you, the better will be the repair.

Autoglym 500ml Fabric Hood Maintenance Kit (2 Pieces)


  • Cleans and preserves fabric car hoods

  • Protects and preserves the surface from the effects of water absorption and surface soiling;

  • Removes soiling, stains and atmospheric contamination from natural and synthetic fabrics

  • Easy to use two part maintenance kit

  • Cleans, freshens and revives appearance
.
.

6 common Check Engine light problems

Check Engine - Service Engine Soon light
There are hundreds of possible problems that can cause the Check Engine light to come on in your car. We have analyzed thousands of repair cases in hundreds of different cars. We found several problems that are common in many cars and often produce similar symptoms. They are listed below. Of course, the causes might be different for different cars. To find out the exact cause and repair the problem, you will need to have your vehicle scanned for codes and properly diagnosed. Read this article for more information and ways to save money on diagnostics and repair.

Air induction system issues

Mass air flow sensor
Mass airflow sensor. Click for larger photo
Air induction system is responsible for supplying air to your engine. Major components of the air induction system include an intake manifold, throttle body, a rubber boot that connects the manifold to the air filter box, an airflow sensor and air filter. Often, a leak at one of the components (called vacuum leak) lets the air to enter the engine bypassing the airflow sensor. This can cause the engine to run "lean". This means that the engine is not getting enough fuel, or in other words, the air-fuel mixture has more air and less fuel than needed. A faulty or dirty airflow sensor may also cause the same problem. Symptoms of an engine "running lean" include RPMs fluctuating up and down, stalling, rough idle, difficulty starting and lack of power. Often an engine starts, but stalls right away. Common Check Engine fault codes related to this problem are P0171 and P0174, P0101, P0102.

Misfiring

On-plug ignition coil
On-plug ignition coil. Click for larger photo
An engine "misfires" when some of its cylinders don't work. Symptoms of a misfiring engine include shaking and lack of power. This might be more noticeable at idle. When an engine misfires, the Check Engine light flashes repeatedly or stay on solid on the dash. Sometimes misfiring happens at a cold start and goes away when the engine is revved. Often the engine misfires during rainy weather or after driving through a puddle or when accelerating from a stop. In most cases, the misfiring is fairly easy to diagnose. A faulty ignition coil is the most common culprit in many modern cars.

EVAP system leaks

EVAP purge valve
EVAP system purge valve Click for larger photo
The EVAP system prevents the gasoline vapors in your gas tank from escaping into the atmosphere. It's a sealed system and if there is a leak, the car's computer turns the Check Engine light on. Evap leaks rarely cause any driveability symptoms. A loose gas cap is one of the examples of an EVAP system leak. Other common sources of an EVAP system leak include a purge valve and a canister vent valve. Related OBD II codes: P0446, P0455, P0441.

EGR system problems

Sticky EGR valve
Bad EGR valve
The EGR or Exhaust Gas Recirculation is one of the vehicle's emission control systems. It reduces the combustion temperature by redirecting a small amount of exhaust gases back into the engine intake. The main component of the EGR system is the EGR valve. Often, carbon deposits and soot accumulated inside the valve preventing it from opening and closing freely. This will cause the Check Engine light to come on. Symptoms of a sticky EGR valve include stalling at idle, rough idle. Sometimes these symptoms happen after exiting the highway. In some cars, when the EGR system is clogged up, the Check Engine light may come on, but no other symptoms would be present. Common fault codes: P0400, P0401.

Oxygen sensor or air/fuel ratio sensor problems

Oxygen sensor
Oxygen sensor
An oxygen sensor is the primary sensor in the fuel injection system. Installed in the vehicle's exhaust, it provides feedback for the engine computer on how efficiently the engine runs. A more precise air/fuel ratio sensor used in many modern cars for the same purpose is also commonly referred to as an "oxygen sensor". Oxygen sensor problems are also common. A failed or deteriorated oxygen sensor may cause a drop in the fuel economy and the Check Engine light to come on, but the vehicle may still drive fine. Common causes include a failed oxygen (air fuel ratio) sensor and shorted out sensor wires. Common fault codes: P0130, P0133, P0134, P0135, P0136.

Failed catalytic converter

Catalytic converter
Catalytic converter
A catalytic converter is the main emission control device installed in the vehicle's exhaust. It has a honeycomb-like ceramic structure inside that helps to burn any unburned fuel and reduce other harmful emissions. A failing or clogged up catalytic converter often causes the Check Engine light in many cars and trucks. When a catalytic converter becomes clogged up, an engine may start and run well at idle, but bog down when accelerated. A rattling noise coming from a catalytic converter and a smell of unburned fuel from the exhaust may indicate that the ceramic structure inside the converter has disintegrated. In either case, the catalytic converter will need to be replaced. The most common Check Engine light codes: P0420 and P0430. The catalytic converter is typically covered by 8-year 80,000-mile Emission Warranty. If your car is still within the warranty coverage, your dealer should be able to help you

Check Engine light: what to check, common problems, repair options

Check Engine - Service Engine Soon light
It's the source of anxiety faced daily by many motorists: the Check Engine Light. It means that the computer in your car has detected a problem with one of the systems that affect exhaust emissions. How expensive is the repair? Is it a minor glitch or serious problem? Is it safe to drive? To find the answer to these questions you will need to have your vehicle scanned and properly diagnosed.

It's not that difficult, many car dealers and repair shops deal with these problems every day. There are stores that may offer to scan your car for free. There are also a few things that you can check on your car yourself, but first, let's see how it works. 

Your car has a computer called Powertrain Control Module or PCM that controls your vehicle's engine, transmission and emission control systems. There is a number of electronic sensors that monitor various systems. If the signal from any of the sensors moves out of expected range for a certain period of time, the PCM detects a fault, turns the Check Engine light on and stores the code related to the fault in its memory. 
Start by answering these questions and follow the link. 

1. Is the Check Engine light flashing repeatedly? Yes No
2. Is your gas cap closed properly? Yes No
3. Does your engine have enough oil? Yes No 
4. Has the Check Engine light came on soon after you had your car serviced? Yes No

Is it safe to drive with the Check Engine light on?

It depends on what the problem is. Some problems are minor and won't affect your vehicle's performance, but in other cases, driving with the Check Engine light may cause more damage to your vehicle. In worst cases, a car may stall or lose power unexpectedly. To be on the safe side, we recommend to have your car checked out as soon as possible.

What are the repair options?

Scanning the car computer for check engine codes
A technician at at a dealership using a scan tool
Dealers have factory-trained technicians that are familiar with common problems in their cars and have manufacturer-provided technical support. They have access to proper testing equipment and up-to-date repair information for your car. Dealers use OEM (original) parts that in some cases are updated to improve reliability. On the downside, repairs at a dealership tend to be more expensive when the car is out of warranty.
Independent or franchise repair shops are usually less pricey, but a lot depends on the professional level of technicians, availability of proper testing equipment, latest service information and quality of replacement parts. 
Brand-specialized shops
Another popular option is to take your car to an independent shop or a mechanic that specializes in your vehicle's brand. This is especially true for German or other European cars, since they have more complex electronics. 
Do it yourself Of course, there is always a DIY option. if you have sufficient mechanical knowledge and proper tools, all you need to start is to scan your car and find out the trouble code (DTC). Thanks to generous people that don't mind sharing their knowledge, there is plenty of information, how-to guides and videos available on the internet.

Where to scan your vehicle for free

Some auto parts stores and independent auto repair shops offer to scan your car for free, in hopes that you will buy parts or do the repairs at their shop. Google 'free check engine light scan' + ' your town' to find a shop that will scan your car for free. Some dealers and repair shops offer a free Check Engine light scan as a seasonal promotional. The Volvo Service for Life program, for example, includes up to one hour of computer diagnostics. Another option is to ask your friends and relatives. OBD-II scan tools are not very expensive and widely available. Many people have a scan tool in their households these days.

What are the common problems that can cause the Check Engine light?

There are hundreds of potential faults that can cause the Check Engine light, but several problems are fairly common. They include vacuum leaks, mass airflow sensor issues, misfiring, catalytic converter problems, Evaporative system (EVAP) leaks, oxygen sensor issues and Exhaust Gas Recirculation (EGR) system problems.

The Check Engine light flashing repeatedly

If the Check Engine light is blinking repeatedly, it means that the engine computer has detected that your engine 'misfires', or some of its cylinders are not working properly. Driving with a misfiring engine could damage your catalytic converter, which is an expensive part. If you check your owner's manual, it will probably suggest to reduce power and have your vehicle serviced immediately by your authorized dealer.

Is your gas cap closed properly?

The Check Engine light might also come on if your gas cap is not closed tight. In some cars, the string that holds the cap might get caught in the cap's thread and prevent it from sealing. If you did find that the gas cap wasn't tight, close it properly and if there are no other problems, the Check Engine light will reset by itself after a day or two of driving. If the gas cap was tight, there is probably some other problem.

Do you have enough oil in the engine?

The low oil level also can cause the Check Engine light to come on. Driving with low oil level can actually damage your engine. Your owner's manual describes how to check the engine oil level in the 'Maintenance' section.

The Check Engine light came on soon after the car was serviced

If the light came on soon after the vehicle was serviced, it's reasonable to have the same shop re-check your car. Whether the problem is related to the last service or not, it's a common practice for reputable repair shops to assist their loyal customers as much as possible in cases like that. The repair cost will depend on the cause.

Emission warranty

A federal emission warranty covers major components of the emission control system such as the engine computer (PCM) and the catalytic converter for the period of 8 years or 80,000 miles (128,000 km in Canada). If your car has the codes related to the failed catalytic converter (e.g. P0420, P0421, P0430) check the emission warranty coverage details with your dealer.

How to Extend the Life of Your Car and Avoid Problems

Some car owners drive their cars for many hundred thousand miles without major issues, while others pay thousands in repair bills. What is the secret? Here are 10 proven tips: 

1.Get to know your car

Wash your car regularly
Your owner's manual is a valuable source of information about your car. Keep it in your glove box and if you happen to have a minute, browse though it. It will tell you how to use various features of your car and prevent problems. Among other things, it has a map of the engine compartment, so you can see how to check your oil, coolant or transmission fluid.

2. Have your oil changes done regularly

Adding engine oil
All moving parts inside your engine are lubricated by oil. As you drive, the engine oil gets dirty and loses its lubricating qualities. Your engine wears faster if the engine oil is old and contaminated. By having your oil changes done regularly, you keep your engine well lubricated and clean inside. 
As you drive some oil is consumed and the oil level drops. Running low on oil also increases engine wear. That is why it's also important to periodically check the engine oil level and top it up if it's low.

3. Keep all fluids in your car clean and topped up

Topping up fluids
The health of your automatic transmission depends on the condition of the transmission fluid. The same goes for the braking and power steering systems, the engine cooling system, transfer case and front and rear differentials. All the fluids are vital for your car and over time they evaporate, leak and lose their qualities, so change as needed and top up when the level is low.
If you use your car for towing, consider installing an additional transmission fluid cooler and change the transmission fluid more often.

4.Be aware of early signs of problems

Temperature gauge
Any problem with your car will be less expensive to repair if caught earlier. Have your car checked out as son as possible if you notice any signs of problems. Warning lights on the dash, engine temperature rising more than normal, leaks, noises when driving over bumps or while braking, unusual smell, difference in the way the car drives or shifts gears are some of the early signs of mechanical problems.

5.Wash and wax your car regularly, rustproof to protect from rust

Wash your car regularlyIf you live in the rust belt, rustproof your car to protect the brake and fuel lines as well as other undercarriage components from rust. Wash your car regularly as the corrosion starts in dirty areas. Replace your wiper blades at least twice a year; they are not very expensive. 
Wax your car once in a while; car wax protects the paint and keeps it shiny. Touch up stone chips and scratches before they get corroded.

6.Keep the interior of your car clean and dry

Keep the interior of your car clean and dry
There is a lot of electronics and wiring in the dash, center console and under the carpet. Electronics plus water always equalstrouble
When you keep the interior clean, it stays smell-free. Once the moisture or garbage accumulate, it will be almost impossible to get rid of a bad smell. Most newer cars have a cabin filter that needs to be replaced every 10,000-15,000 miles. A dirty cabin filter also causes a bad smell in a car.

7.Rotate your tires regularly and keep them properly inflated

Check tire pressure regularly
Check tire pressure regularly as under-inflated tires wear faster and cause poor gas mileage. Improper tire pressure increases wear of the 4WD system. Over-inflated tires can cause damage to the steering and suspension components. Change winter tires back to all-seasons after the last blast of winter, as winter tires wear more on dry asphalt. Rotate your tires regularly; in some cars tires can become cupped and noisy if not rotated as often as recommended (e.g. Mazda 3, Honda Civic). Have the wheel alignment checked at least once in two years. Improper wheel alignment causes increased tire and suspension wear and poor handling.

8.Drive smoothly

Drive smoothly
Full-throttle acceleration is bad for your car. Drive smoothly. One burnout or drag race will result in more wear than months of normal driving. The same goes for hard braking.
Driving fast over speed bumps can damage your struts and other suspension components, as well as the wheel bearings and rims. 
If your daily commute involves only short trips, take your car on the highway once in a while. During short trips, your engine cannot warm up fully causing moisture to accumulate inside it.

9.Service your car at a reliable repair shop

Find a good trusted mechanicFind a trusted and knowledgeable mechanic or a reputable repair shop for all your service and maintenance needs. Ask your friends for recommendations. A mechanic who deals with your car on a regular basis will know better what it needs and will do a better job to keep you as a satisfied customer.
Have your car checked out at least once a year on the lift to keep it safe. It's always better to use only OEM or known good quality parts.

10.Do regular tune-ups and other required maintenance

Tune-up items
Besides regular oil changes, your engine needs a few other things. An air filter needs to be replaced every 10,000-20,000 miles. Every 60,000-90,000 miles your car needs a tune-up. In some cars, the valve clearance needs to be adjusted regularly. If your car has a timing belt, it needs to be replaced at recommended intervals too. You can check the maintenance schedule in your owner's manual or ask your mechanic.

How to inspect a car body when buying a used car


Restored after accidentHundreds of car accidents happen every day, yet how often do you see a used car advertised as "Restored After Accident?"Do all damaged cars get scrapped? What happens to them? Yes, some cars are written off and squashed or stripped for parts, but others are restored and brought back to the used car market. Is it possible to restore a damaged car so well that it will be difficult to spot any signs of an accident? Yes, any car can be restored even after a very serious collision so that it would be very difficult to notice any difference. So, how can you check if a used car has been previously involved in an accident? This is a three-step process:
1. Check the used car history records. Most accidents are reported and the used car history report may show you that the "clean" used car you were about to buy had been damaged in a serious accident before. Many "bad" used cars can be filtered out from your list this way.
2. Carefully inspect a used car for signs of previous accidents or corrosion yourself. Is it difficult to spot signs of previous accidents? It's not easy, but if you know what to look for, you might be able to catch some telltale signs - we wrote this guide to help you. Read and see photos below. 
3. Have the used car properly inspected by a knowledgeable mechanic or used car inspector.
• Should you buy a car that has been in an accident?
• Rust damage
• Reflection can tell a lot
• Check how different panels fit together
• Compare opposite sides of the car
• Watch out for mismatched colors and difference in paint texture
• Look for paint overspray
• See if any of the body panels have been moved
• Watch out for rust
• Check for signs of flood damage
• Have a car properly inspected

Should you buy a car that has been in an accident?

The short answer is no, unless it was some minor fender-bender. We don't want to say that a damaged car cannot be restored to a like-new condition; there are plenty of collision repair shops that do an excellent job. The problem is that for an average buyer it's very difficult to determine if a car has been repaired to the highest standards or was just quickly "patched up" for a fast sale. This means that buying a car that has been restored after an accident is taking a chance. Were repairs done properly or rust spots will appear after a year or two? Was the wheel alignment done right or will the car "eat" tires? Will the air conditioner still work after a few months? Will the paint peel away or fade?

Rust

Rust is another issue with used cars, especially in the areas where salt is used in winter months. Unless a car has been properly rust proofed, any 5-6 year old and older car or truck from the 'rust belt' will show at least some rust. In some cars, you will see just a few spots here and there; in others, you might see rusted through floors, body panels or brake components. Rust spots can be repaired temporarily but once the corrosion process is started, it's very difficult to stop. If a car had major rust spots repaired, the rust will re-appear later. Therefore, similarly, to previous accidents, major rust is something to avoid in a used car.

Reflection can tell a lot

Car body lines
The easiest way to quickly spot signs of a body repair or a paint job is to look at the reflection. This car, for example, looks line new. The lines are straight and the paint surface is very smooth.
Car with visible ripples
Here, you can see some unevenness in the reflection. It looks like there was there was some body repair on the rear left fender. Click on the image to see the larger photo.
Car with visible ripples
A closer look at the rear fender reveals this: a peeling off clearcoat. It's another sign of a paint job.
Paint texture shows signs of a body repair
The rear corner of this SUV has been repaired. As you can see, the reflection looks not very smooth. Click to see the larger image. Pay closer attention to to area under the gas tank lid and in the corner near the tail light. You can see some unevenness there too.

Check how body panels fit together

The door of this Dodge is not flush
See how different body panels fit together. For example, the doors, when closed should be perfectly flush with other panels. The same for the hood, trunk lid and other panels. Look at this blue car, its rear door is not flush when closed; there was some body repair.
Bumper is loose
Look at this car, the front bumper came loose and if you look closely, the bumper has a slightly different color too. It looks like there was a body repair to this corner. If you notice something like this, the area should be inspected more closely.

Compare opposite sides

Same gap on the right side
Here is a trick: if something doesn't look right, compare it to another side. For example, this used Pontiac Vibe was offered for sale at a new car dealership. A salesperson told us that they just got this car. While checking it closely, we found that the gap between the front fender and the door looks wide on the right side.
Gap on the left side
Checking the left side showed a totally different picture; the gap was almost non-existent as you can see in these photos. After further inspection we found that this car has been sideswiped, so its entire front end has shifted to one side. When we pointed this to the used car manager, he apologized and took the car off sale. Turns out they haven't noticed this problem when they got this car from a wholesale auction.
Left front corner
We checked this black Toyota at another dealership. The salesperson was honest and mentioned that the vehicle has been restored after an accident; the car was priced low. We opened the hood and it was easy to see. Compare these two photos; can you spot which side of this car has been damaged? This is the left front fender.
Right front corner
This is the right front fender. This corner appears to have been hit, look at the area around those two bolts holding the fender.


Watch out for mismatched colors and difference in paint texture

Car body lines
Look closely at the quality of the paint. A fresh paint may have a different texture, or signs of a body repair could be noticeable under the paint. In this photo you can see sandpaper marks that are painted over, which is a clear sign of a previous body repair. Click on the photo to see the larger image.
Car with visible ripples
In this photo you can see that the paint texture of this door is not very smooth - there was some body repair here. Feel the paint surface with your hand; the original paint finish should be perfectly smooth, while the repainted panel may feel slightly rough and uneven.

See if the color of different panels match

Color looks the same
Another way to spot a previous body repair is to compare colors of different panels and see if they don't match. The trick is to look from different angles. Here everything looks right, but a look from the different angle shows an entirely different picture (see photo below).
Mismatched colors
The front fender is a bit darker, meaning this Toyota has gone through some body repair. Here is another trick: sometimes it's easier to spot mismatched colors by looking from a distance.

Look for paint overspray

Paint overspray
At the factory, the new car body is painted before anything is installed on it. This means that any plastic trim or wiring should not show any signs of paint. Here, however, you can see that the door wiring harness has some white paint sprayed on it, which is an indication of a body repair.
Paint overspray
Here is another example: if you look closely, a small area of this door trim shows signs of a white paint. This car obviously had a recent paint job.

Check the bolts that connect the hood to the hinges

Color looks the same
Here is another tip: open the hood and check the bolts that hold the hood hinges. Here you can clearly see that this bolt has been scratched. This means that the hood was either replaced or readjusted from its original position. There was some body repair here.
Mismatched colors
This is how these bolts should look like originally. As you can see, these bolts have never been touched after the vehicle was painted at the assembly plant.

Watch out for rust

Rust spot
A few small spots like this is not a big deal, but watch out for major rust.
Major rust
This rust spot has already been repaired and now it's rusted again. If the car has major rust spots like this, avoid it. If you suspect a repaired rust spot, try to stick a small magnet; it won't stick if there is too much filler and very little metal.

Avoid previously flooded cars

Flooded cars
New Orleans, La. Photo: Marty Bahamonde/FEMA
You should definitely avoid used cars that have been flooded in the past. A flooded vehicle is more likely to develop various electrical problems and mold in the future.
Signs of a flood damage in a used car
This car looks fairly clean and runs good, but something doesn't look right about this speaker mesh. It looks like a dirty water level mark. Was this car flooded?
Signs of a flood damage in a used car
To confirm we removed the rear trim piece from the center console. There's no questions this car was flooded and you can see the water level marks on the inside of the trim piece. This car should be avoided. A history report can also reveal a previous flood damage. Be suspicious if the history report indicates that the car came from a recent flood zone.